How to create water droplets with watercolour
Handy tips for how to paint water droplets in water colour and how I created them for my water colour botanical illustration. Find out what brushes I used and more on my wet on wet and layering techniques.
Siobhan Guthrie
5/16/20261 min read

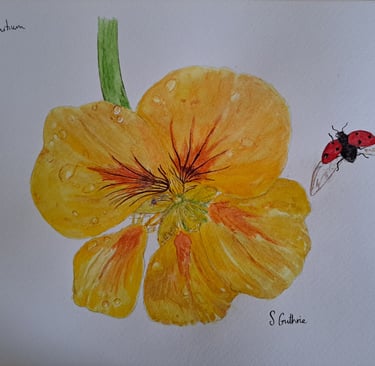
As part of my continuing exploration of plants, flora and fauna you will have seen my Nasturtium and ladybird painting. I had always wanted to have a go at painting dew drops and my photograph gave me the perfect opportunity to do just this. Water droplets using water should be fairly simple but it is a little more tricky and experimental than it would at seem at first. I tried different techniques. First I tried using gel pen to create highlights as you can see on one of the top petals but I didn’t feel that this was particularly successful. My alternative method was to paint a very pale base wash of water colour pigment for each petal using a medium rounded brush. I let that dry before adding my layers of stronger hues and anywhere I wanted to place a dew drop I painted the shape of the water droplet leaving the pale base layer exposed. Next I painted the shadow of the dew drop by looking very closely at my original photograph to work out where all the shadows were. For these tiny delicate lines I always use my fine bristled spotter brush which allows me to add fine detail to any painting. Finally, I painted a slightly darker hue for contrast between the shadow and the light. I had to be careful to not let it bleed into the area where I wanted the droplet to appear to catch the light. This was a valuable lesson in letting the paper dry and building textures up in layers. There are dozens of YouTube videos and other content out there about how to paint water droplets. Why not pick up your paint brush and have a go yourself?
Contact
If you have any questions about my creative processes or wish to commission a work please contact me. If you would like to commission a pet portrait, please write your pet's name/s in the subject line of the email along with a photograph for me to work from.
© 2026. All rights reserved